COMC Blog
COMC BLOG
- Messages
- 274
- Real Name
- www.comc.com
Last month, we released an updated version of the much requested COMC Bulk Price Editor for our sellers to utilize. Please refer to our original blog post for download link and instructions. Please note that the Bulk Price Editor will only work on Windows Operating Systems.
This tutorial is intended to walk you through the experience of using the Editor for the first time. In this tutorial, we will show you a basic overview of how you can reprice a large segment of your items using this tool.
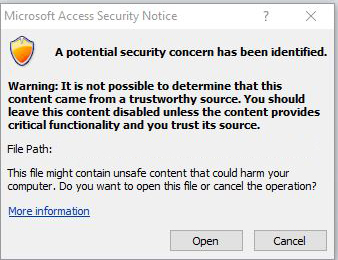
When you run the Bulk Price Editor, you will be prompted with the following Microsoft Access Security Notice:

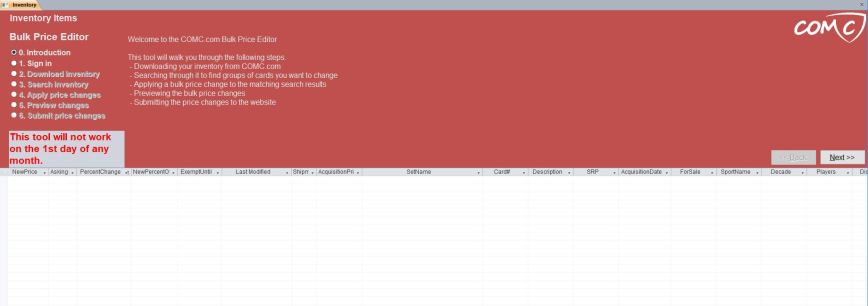
Do not worry, this is to be expected! Simply press the Open button to launch the Bulk Price Editor. Once you do so, you will reach the Introduction page of the program. This page outlines all of the steps necessary to utilize the Bulk Price Editor. The <back> and <next> buttons found in the lower right portion of the red menu will be used to guide you through the six steps found on the left.

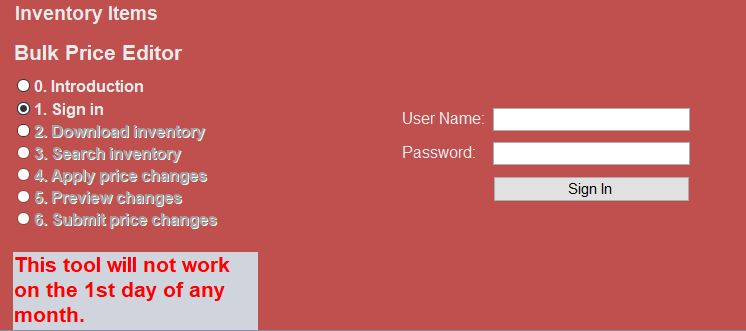
Click <Next> to continue to the Sign in page from the introductory screen. This will take you to the Sign in page:

Enter your COMC Username and Password on this page, and click the Sign In button to get started. Once you have done so, you will be prompted to download all of your account’s inventory into the Bulk Price Editor as seen below:

On average, this process takes about 10 seconds per 10,000 items in your account, but could take longer depending upon your internet connection speed among other factors. Once your inventory has been downloaded into the Bulk Price Editor, the spreadsheet below the menu will be populated with items from your account.
( Please note that although it is recommended that you download an updated version of your inventory every time that you launch the Bulk Price Editor, if you have not made any changes to your inventory since the last time you used the tool, you can use the data previously downloaded in an earlier session.)

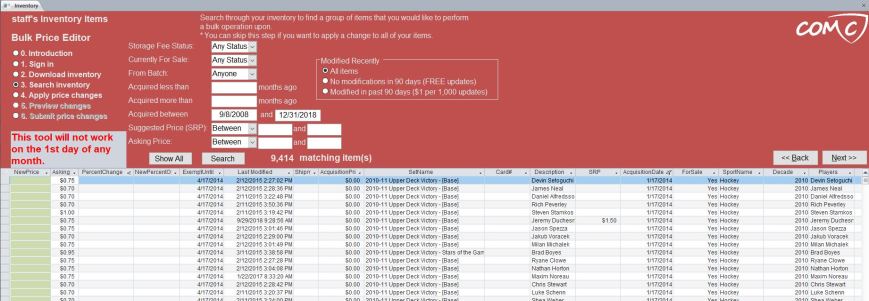
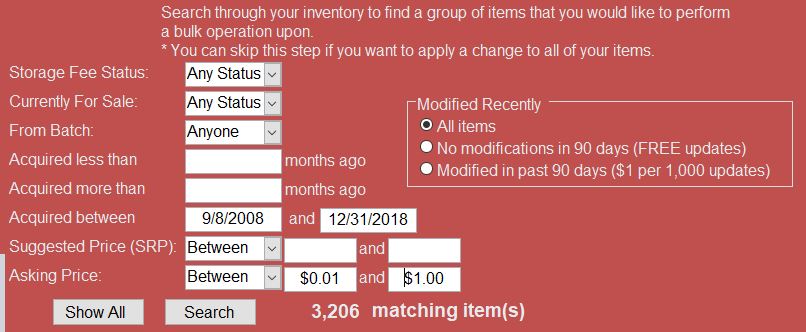
Once you have downloaded your inventory into the Bulk Price Editor, you are now able to search your inventory in order to filter which items you would like to edit in bulk. The options for searching are as follows:
Storage Fee Status: Subject to Fee or Exempt from Fee
Currently For Sale: For Sale or Not For Sale
From Batch: Choose items a specific consignment batch number
Acquired less than ____ months ago
Acquired more than ___ months ago
Acquired Between Date Range
Suggested Retail Price Range
Asking Price Range
Additionally, on the right of these options is the ‘Modified Recently’ box with three radio button options. Items that have not been modified over the last 90 days are free to update using the Bulk Price Editor. Items that have been modified in the past 90 Days can also be modified, and those modifications are currently free as of this tutorial being posted. Please note that there may be a charge to edit items that have been recently modified in the future.
Using these filters, you should be able to carve down your inventory to the exact parameters, of the items that you want to reprice. For this walk through, we’ve chosen all of the items within our account with an asking price of $0.01 to $1.00. This has reduced our matching items from the 9,414 total items in our account down to 3,206 items.

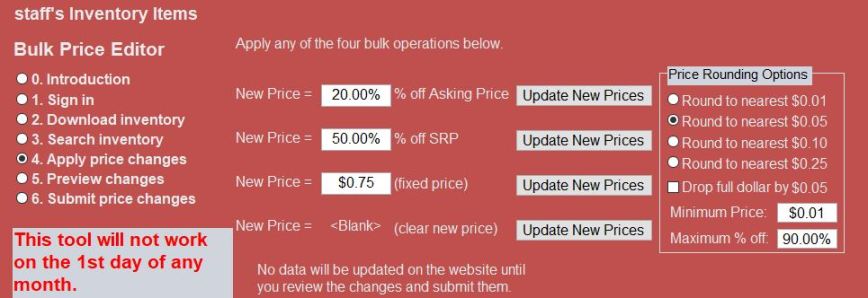
Clicking the <next> button on the right side of this screen will then take you to the Apply Price Changes page seen below. This page will give you several options to choose how you would like to reprice your items in bulk.

There are four bulk operations that you are able to customize to your liking. You can choose from the following options:
Percent Off Current Asking Price – This will reduce all specified items by a percentage that you determine. If you have an item with a current asking price of $10, and use this option to lower your prices by 20%, your new asking price will be $8.
Percent Off Suggested Retail Price – This will reduce all specified items by a percentage off SRP that you determine. If you have an item with an SRP of $25.00, and use this option to lower your prices by 50% off SRP, your new asking price on that item will be $12.50.
New Fixed Price: This will set a fixed price for all specified items. If you’ve filtered your inventory to 250 items, all items will receive the same fixed price using this option.
Clear New Price: This option will clear all of the asking prices for the specified items found on this page and reset your changes. Use this option if you are unsatisfied with the prices in the spreadsheet below once you have already used one of the other three update new prices buttons.
In the box to the right of these options, you will find price rounding options to make your listings more visually appealing to buyers. Additionally, you will find options to drop full dollar prices by $0.05, set a minimum item price, and a maximum percentage off as well. Choose your price rounding options, determine which of four bulk pricing operations you want to use, entered your percentage off or fixed price, and press the update new prices button that is next to the bulk operation that you’ve chosen.

For our walk through, we’ve chosen to to reprice all of our items to 20% off of our current asking price, with prices rounded to the nearest $0.05 , and a minimum asking price of $0.05 as well. Depending on the quantity of items that you are editing, the Bulk Price Editor will need a little time to prepare these price changes. Once this operation is complete, press the <next> button to preview your changes, as your specified changes have not yet been populated to COMC.

Hit ‘OK’ on the prompt letting you know that changes have been made in the spreadsheet below. The spreadsheet will now contain a preview of all of the pending changes that you have specified on the previous apply price changes page.
IMPORTANT: Please review these prices to make sure that the perimeters that you’ve specified are your desired changes, as COMC is not responsible for erroneous changes to your asking prices made by the Bulk Price Editor.

If you have any items that have had their price modified in the last 90 days, you will be shown the cost to update those items in the red menu above. As stated earlier, the Bulk Price Editor is free to use for all items presently as of this writing, but a charge may be assessed for recently modified items in the future. Choose which of the two options you would like to use and hit the <next> button.

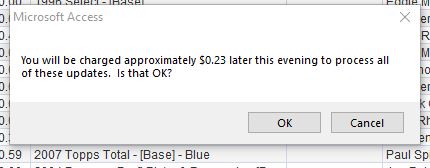
If you are satisfied with your changes, hit the ‘Submit Pending Price Changes’ button the began updating your specified prices in bulk. If you’ve chosen an option that will assess a fee, an additional prompt will appear. As of this tutorial being posted, all functionality of the Bulk Price Editor is free, and your account will not be charged despite seeing this prompt:

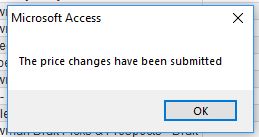
Press OK on this prompt if you wish to continue. Once you have done so, you will again be prompted once your price changes have been successfully submitted:

We hope that this walk through helps you with a better understanding of what is possible using the Bulk Price Editor. This is a very powerful tool, and not all of the advanced options, such as setting multiple search perimeters for defining your inventory, have been covered in this walk through. We recommend that you spend some time experimenting with the tool to get accustom to all that is possible. If you have any questions, feel free to ask us in the comment section belong and we’ll be happy to answer them!
Continue reading...
This tutorial is intended to walk you through the experience of using the Editor for the first time. In this tutorial, we will show you a basic overview of how you can reprice a large segment of your items using this tool.
When you run the Bulk Price Editor, you will be prompted with the following Microsoft Access Security Notice:
Do not worry, this is to be expected! Simply press the Open button to launch the Bulk Price Editor. Once you do so, you will reach the Introduction page of the program. This page outlines all of the steps necessary to utilize the Bulk Price Editor. The <back> and <next> buttons found in the lower right portion of the red menu will be used to guide you through the six steps found on the left.
Click <Next> to continue to the Sign in page from the introductory screen. This will take you to the Sign in page:
Enter your COMC Username and Password on this page, and click the Sign In button to get started. Once you have done so, you will be prompted to download all of your account’s inventory into the Bulk Price Editor as seen below:

On average, this process takes about 10 seconds per 10,000 items in your account, but could take longer depending upon your internet connection speed among other factors. Once your inventory has been downloaded into the Bulk Price Editor, the spreadsheet below the menu will be populated with items from your account.
( Please note that although it is recommended that you download an updated version of your inventory every time that you launch the Bulk Price Editor, if you have not made any changes to your inventory since the last time you used the tool, you can use the data previously downloaded in an earlier session.)
Once you have downloaded your inventory into the Bulk Price Editor, you are now able to search your inventory in order to filter which items you would like to edit in bulk. The options for searching are as follows:
Storage Fee Status: Subject to Fee or Exempt from Fee
Currently For Sale: For Sale or Not For Sale
From Batch: Choose items a specific consignment batch number
Acquired less than ____ months ago
Acquired more than ___ months ago
Acquired Between Date Range
Suggested Retail Price Range
Asking Price Range
Additionally, on the right of these options is the ‘Modified Recently’ box with three radio button options. Items that have not been modified over the last 90 days are free to update using the Bulk Price Editor. Items that have been modified in the past 90 Days can also be modified, and those modifications are currently free as of this tutorial being posted. Please note that there may be a charge to edit items that have been recently modified in the future.
Using these filters, you should be able to carve down your inventory to the exact parameters, of the items that you want to reprice. For this walk through, we’ve chosen all of the items within our account with an asking price of $0.01 to $1.00. This has reduced our matching items from the 9,414 total items in our account down to 3,206 items.
Clicking the <next> button on the right side of this screen will then take you to the Apply Price Changes page seen below. This page will give you several options to choose how you would like to reprice your items in bulk.
There are four bulk operations that you are able to customize to your liking. You can choose from the following options:
Percent Off Current Asking Price – This will reduce all specified items by a percentage that you determine. If you have an item with a current asking price of $10, and use this option to lower your prices by 20%, your new asking price will be $8.
Percent Off Suggested Retail Price – This will reduce all specified items by a percentage off SRP that you determine. If you have an item with an SRP of $25.00, and use this option to lower your prices by 50% off SRP, your new asking price on that item will be $12.50.
New Fixed Price: This will set a fixed price for all specified items. If you’ve filtered your inventory to 250 items, all items will receive the same fixed price using this option.
Clear New Price: This option will clear all of the asking prices for the specified items found on this page and reset your changes. Use this option if you are unsatisfied with the prices in the spreadsheet below once you have already used one of the other three update new prices buttons.
In the box to the right of these options, you will find price rounding options to make your listings more visually appealing to buyers. Additionally, you will find options to drop full dollar prices by $0.05, set a minimum item price, and a maximum percentage off as well. Choose your price rounding options, determine which of four bulk pricing operations you want to use, entered your percentage off or fixed price, and press the update new prices button that is next to the bulk operation that you’ve chosen.

For our walk through, we’ve chosen to to reprice all of our items to 20% off of our current asking price, with prices rounded to the nearest $0.05 , and a minimum asking price of $0.05 as well. Depending on the quantity of items that you are editing, the Bulk Price Editor will need a little time to prepare these price changes. Once this operation is complete, press the <next> button to preview your changes, as your specified changes have not yet been populated to COMC.

Hit ‘OK’ on the prompt letting you know that changes have been made in the spreadsheet below. The spreadsheet will now contain a preview of all of the pending changes that you have specified on the previous apply price changes page.
IMPORTANT: Please review these prices to make sure that the perimeters that you’ve specified are your desired changes, as COMC is not responsible for erroneous changes to your asking prices made by the Bulk Price Editor.

If you have any items that have had their price modified in the last 90 days, you will be shown the cost to update those items in the red menu above. As stated earlier, the Bulk Price Editor is free to use for all items presently as of this writing, but a charge may be assessed for recently modified items in the future. Choose which of the two options you would like to use and hit the <next> button.

If you are satisfied with your changes, hit the ‘Submit Pending Price Changes’ button the began updating your specified prices in bulk. If you’ve chosen an option that will assess a fee, an additional prompt will appear. As of this tutorial being posted, all functionality of the Bulk Price Editor is free, and your account will not be charged despite seeing this prompt:
Press OK on this prompt if you wish to continue. Once you have done so, you will again be prompted once your price changes have been successfully submitted:
We hope that this walk through helps you with a better understanding of what is possible using the Bulk Price Editor. This is a very powerful tool, and not all of the advanced options, such as setting multiple search perimeters for defining your inventory, have been covered in this walk through. We recommend that you spend some time experimenting with the tool to get accustom to all that is possible. If you have any questions, feel free to ask us in the comment section belong and we’ll be happy to answer them!
Continue reading...

